A flange binding offers a chance to use an accent colour around the perimeter of a quilt, plus it helps make binding by machine super easy.
Choose one fabric to act as the binding, and one to become the flange.
Cut and join the binding strips into one long strip as you would for regular binding. Do the same with the flange fabric.
Still at the ironing board, fold and press the entire thing in half along its length.
A flange is automatically created.
Sew the newly created "binding strip with flange" on the BACK of the quilt, exactly as you would a traditional binding. Use a quarter-inch seam allowance.
Be sure it is face down on the back so when it wraps to the front of the quilt, the flange will show.
Join the ends in a miter just as you would a traditional binding.
(Here's how I do that.)
TIP: The strip you have just created measures two-and-three-eighths of an inch wide, so THAT is the amount of overlap you must use to create the miter join. (The overlap always matches strip-width for this process.)
Press the binding straight out from the back of the quilt like a wing. Press up to the corners, but not into them.
Wrap the flange binding to the front of the quilt, filling the binding but not pulling so hard as to cause distortion of the edge.
I use "Wonder Clips" to hold the binding in place, except for the corners where I use a strategically placed pin to hold the miter in place. Pins would work, too, but I find these clips convenient.
Instead of clipping all the way around the quilt (they would get dislodged anyway), I use three or four clips ahead of my needle. As I sew up to each clip, I rearrange the quilt so there is no stretching and pulling, take off the clip and move it forward to the next spot that needs one (like leap frog).

I match my thread colour to the FLANGE (top and bobbin), and then stitch-in-the-ditch on top of the flange, keeping my needle as close to the binding as possible (staying right in the groove).
Keep an eye on the right edge of the binding as you work. Folding the fabric over and filling it with a consistent amount of batting will keep the right edge nice and straight.
A stitch-in-the-ditch foot helps things go smoothly.
Once you've sewn all the way around, you are done!

Also linking up with:
Fabric Frenzy Friday at Fort Worth Fabric Studio
Finish it up Friday at Crazy Mom Quilts
Show Off Saturday at Sew Can She
Small Blog Meet and Fresh Sewing Day at Lily's Quilts
Have a wonderful weekend, everyone!
Try, Learn, Grow!
Carole
Comments are welcome. Thanks so much for looking around!
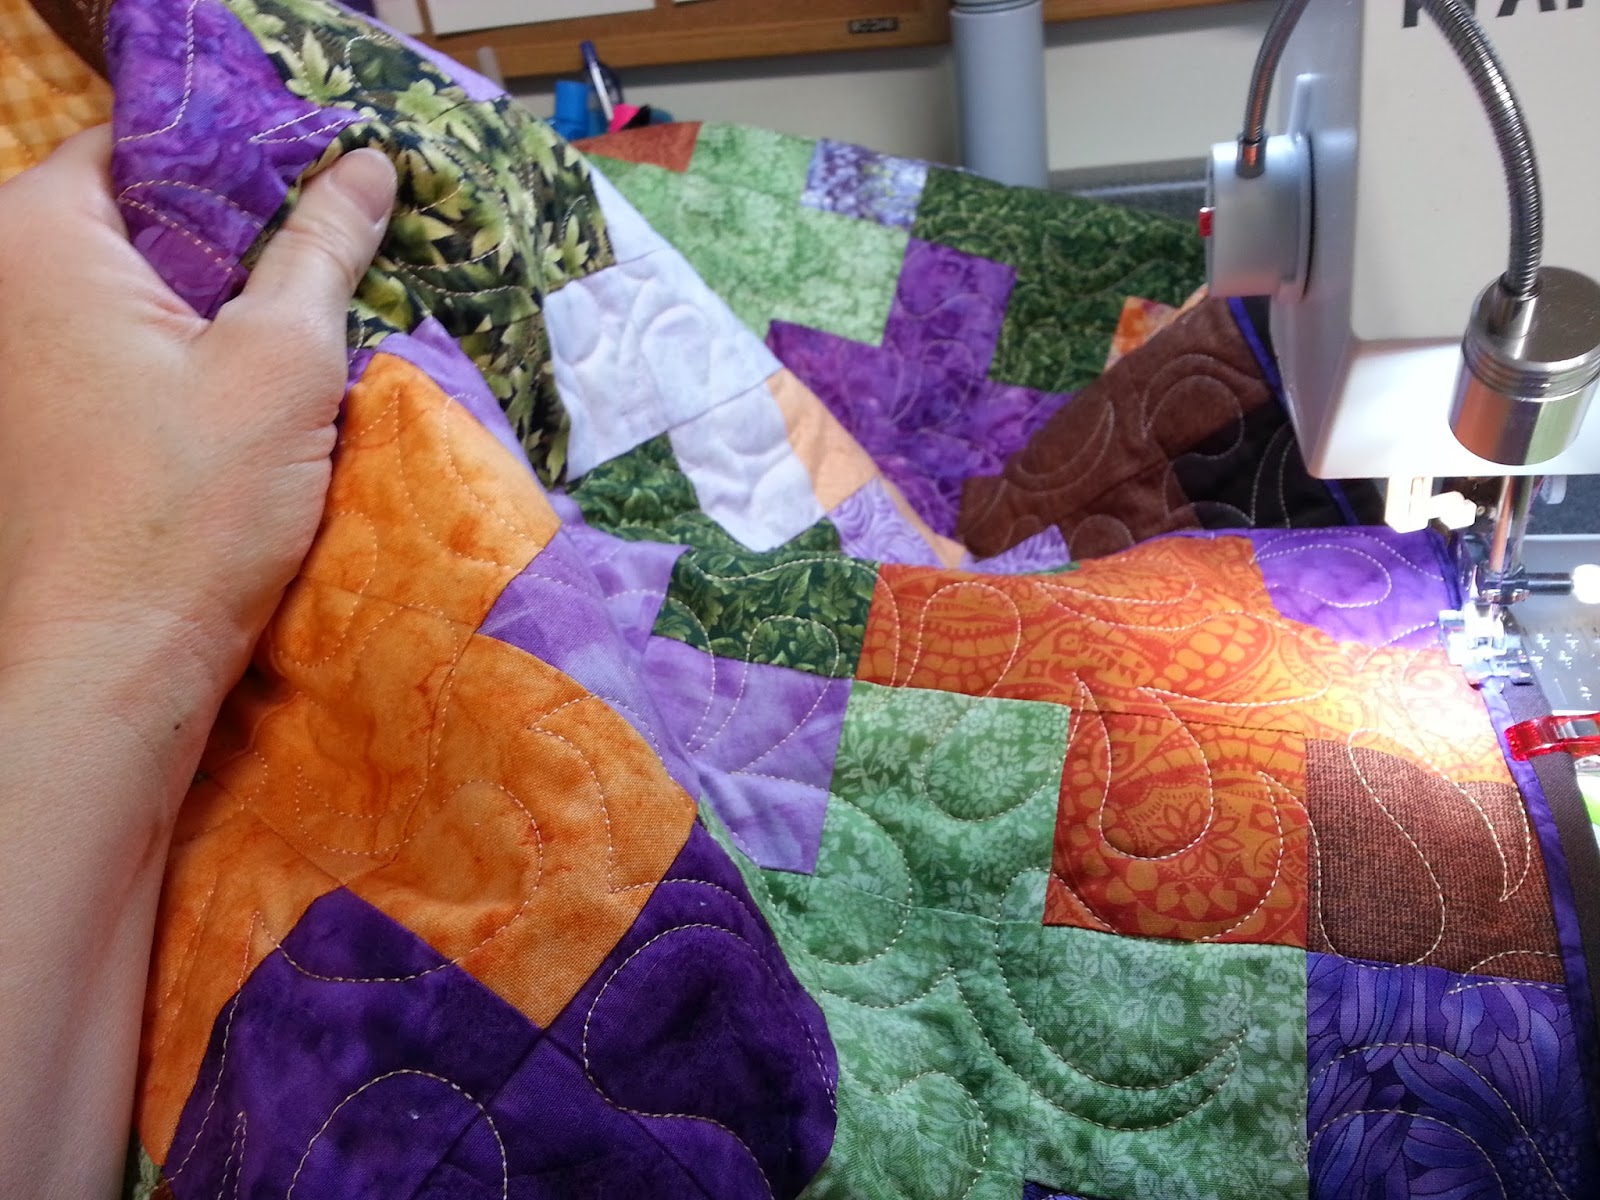 |
| Action shot! Constantly rearranging the quilt to reduce stress and stretch at the needle helps my binding lay flat in the end. |
If you would like to try this technique in place of a regular binding, here's what to do:
Choose one fabric to act as the binding, and one to become the flange.
Cut and join the binding strips into one long strip as you would for regular binding. Do the same with the flange fabric.
 |
| The purple will become the flange, and the brown will be the binding. |
The binding fabric is cut narrower than the flange fabric.
 |
| Cut BINDING strips @ one-and-a-quarter inch. |
 |
| Cut FLANGE strips @ one-and-five-eighths inch. (Each black tick mark on the ruler is an eighth of an inch) |
Sew the strips right sides together using a quarter-inch seam allowance.
 |
| I press mitered joins open to reduce bulk. |
Press seam toward the BINDING fabric.
 |
| The ends don't have to align at this stage. They will be trimmed when they are joined later. |
A flange is automatically created.
 |
| Purple flange, brown binding. |
Be sure it is face down on the back so when it wraps to the front of the quilt, the flange will show.
 |
| Binding strip is FACE DOWN on the BACK of the quilt. Cannot see the brown binding fabric or flange. |
(Here's how I do that.)
TIP: The strip you have just created measures two-and-three-eighths of an inch wide, so THAT is the amount of overlap you must use to create the miter join. (The overlap always matches strip-width for this process.)
Press the binding straight out from the back of the quilt like a wing. Press up to the corners, but not into them.
 |
| Binding is pressed straight out from back of quilt like a wing. Flange will wrap around to the front. |
I use "Wonder Clips" to hold the binding in place, except for the corners where I use a strategically placed pin to hold the miter in place. Pins would work, too, but I find these clips convenient.
Instead of clipping all the way around the quilt (they would get dislodged anyway), I use three or four clips ahead of my needle. As I sew up to each clip, I rearrange the quilt so there is no stretching and pulling, take off the clip and move it forward to the next spot that needs one (like leap frog).
I match my thread colour to the FLANGE (top and bobbin), and then stitch-in-the-ditch on top of the flange, keeping my needle as close to the binding as possible (staying right in the groove).
Keep an eye on the right edge of the binding as you work. Folding the fabric over and filling it with a consistent amount of batting will keep the right edge nice and straight.
A stitch-in-the-ditch foot helps things go smoothly.
 |
| The foot will press down and squash the binding a bit. Have faith that if you hold things firmly in place as you sew everything will work out! |
Coming to a Corner
 |
| Fold bottom edge UP |
 |
| Fold right edge in. Manipulate the fabric until you are happy with the miter. |
 |
| Pin to hold the miter. |
 |
| Use a stiletto or an awl to hold the miter once the pin is removed. One pin around the corner can be handy, too. Pivot around the corner, staying in the ditch as best you can. |
 |
| Finished corners - back and front views. |
It's Whoop Whoop Friday at Confessions of a Fabric Addict.
Can I get a Whoop WHOOP???
Scrappy Plus is FINISHED!!!!
It was a very chilly -31 C (negative 24 F) when I awoke this morning. It warmed up to -23 C this afternoon but there was a nasty, little breeze that cut like a knife, so...no outdoor picture today.
If it's sunny again tomorrow I may brave the weather for a shot, but in the meantime, these will have to do!
 |
| The precarious "chair" shot! |
Also linking up with:
Fabric Frenzy Friday at Fort Worth Fabric Studio
Finish it up Friday at Crazy Mom Quilts
Show Off Saturday at Sew Can She
Small Blog Meet and Fresh Sewing Day at Lily's Quilts
Have a wonderful weekend, everyone!
Try, Learn, Grow!
Carole
Comments are welcome. Thanks so much for looking around!
This turned out amazing! The flange looks great too!
ReplyDeleteThanks Quilty Lady! Nice to see you here!
DeleteThat is very very clever! What a super little tutorial, thanks for sharing your skills!
ReplyDeleteThanks Jen! Always glad to share ideas! I love it when others share what they know, so figured it was my turn to do my part.
DeleteGreat tutorial! Thanks for sharing.
ReplyDeleteMy pleasure. Thanks for stopping by!
DeleteI have read other tutorials on how to do this but yours clicked!! I am definitely going to try this!! Thanks for speaking my language on this one :) and for taking the time to photograph and write the process!
ReplyDeleteThe binding was the perfect choice for this quilt!
Excellent!!! Thanks so much for letting me know. I appreciate the feedback, and am thrilled that you feel confident going forward with this technique. I hope all goes smoothly for you!
DeleteThe quilt is so beautiful! Thanks for the tutorial with the flange! I appreciate it and now feel comfortable giving it a try.
ReplyDeleteThanks Julie! It was fun doing the tutorial, and I'm delighted that you feel ready to give it a go. :-)
DeleteWow, that's a great tutorial. I've not seen how that's done before so thanks for sharing! Nice quilt!
ReplyDeleteThanks, Becky. It's a technique I use often. :) I think I'll keep this quilt for myself!
DeleteWow, that gives such a neat edge.
ReplyDeleteThanks, and it's so fast to do. :)
DeleteDropping by from Lilys Quilts Small Blog Meet, absolutely love your instructions for binding with flange - will try that soon!
ReplyDeleteYour scrap quilt is also awesome!
Thanks for letting me know - I'm pleased that you might find this useful...and thanks for the compliment on Scrappy Plus. I'm really happy with how it turned out. :)
DeleteFantastic tutorial! I've never seen a flange done this way, so thank you so much for sharing it with such great pictures and explanations. Your quilt is beautiful too!
ReplyDeleteMy pleasure, and thanks! I use this technique quite often to make a durable finish for quilts that will be washed a million times. :)
DeleteI've never seen this technique before, looks great! I've just dropped in from lily's quilts
ReplyDeleteI'm glad you stopped by. Thanks! Linky parties take us to such interesting places, don't they? I've quite enjoyed hopping around. What does your blog name mean? (The "slinging" part)
DeleteFunny, I've never seen/heard about this type of binding, but now I've seen two tutorials on blogs in the past 2 weeks. Love the idea and cannot wait until I have a quilt to bind to try it out. Thanks!!
ReplyDeleteI hope it goes smoothly for you! It's a great way to finish a quilt quickly, that's for sure.
DeleteOh, Carole, that's so pretty - and thanks for the great tutorial! Whoop whoop!!
ReplyDeleteThank you! I love whoop whoop Friday...thanks for that bit of fun! Hope to whoop it up with you again soon. :)
DeleteIt's a gorgeous finish, Carole and a sweet tutorial. I love that binding method! Congrats! You get an A Plus!
ReplyDeleteThanks Lorna! I noticed that you had used a flange binding on your doll quilts - I think we are birds of a feather. Thanks for the A PLUS - I see what you did there - ha! :-)
DeleteI've always wondered how to do that type of binding. Thanks for the great tutorial! :)
ReplyDeleteThank you for linking up to Fabric Frenzy Friday!
-Lindsey
Fabric Frenzy Friday
Hey, you're very welcome Lindsey! Maybe you will try it sometime now that you know the secret! Thank you for checking out my post, and for the link up opportunity. :-)
DeleteNeat binding. LOVE the quilt. So pretty.
ReplyDeleteThanks so much, Sally!
DeleteDefinitely going to try on the next quilt I bind. Thank you.
ReplyDeleteI love the tutorial & pictures!! Hope I can get the courage to give it a try. Thank you.
ReplyDelete