This is ridiculous.
Somehow my work space shrank to approximately 15 inches square. Ever have that happen?
Time to clear the deck.
Being my stubborn self, I decided that my fabric would fit into its designated cabinet NO MATTER WHAT.
It meant pulling everything out and re-folding every piece of fabric, but I did it!
The mess got bigger before it got better, but it was a great way to rediscover my stash!
And, look - my table has been FOUND!!!
Now I'm on a mission to use things up!
First up, I made three reversible minky & flannel crib blankets for my sweet, new grandson.
The blankets would have knocked my stash back several meters - if I hadn't purchased the fabric specially for the job. (Hmm. I'm beginning to understand my problem . . .)
Second attempt at stash busting - half a dozen baby bibs.
This time I DID raid the stash - the special stash. (Everyone has a special stash, right?)
When we were little, my brother and I had pjs made from this very fabric! My mom passed her flannel leftovers to me when my kids were little. What I didn't use for them was tucked away again, and has now been resurrected for my grandson!
Let's call that fabric "vintage". (Just ZIP IT if you thought "antique". Ha!)
I used a bib from my daughter's babyhood as a pattern.
(Yes, I saved it. Yes, it was used for all of my kids and grands - and visiting littles, too. And yes, I'll probably keep it forever! Doesn't everybody keep random baby items forever?)
Anywho. Enough about my hoarding ways. Back to the bibs!
How they were made
I decided to use flannel (instead of denim) to keep the bibs soft and flexible. The goal is to keep baby's neckline dry when he drools, eats, and spits up. Absorbent is good!
To make a symmetrical shape, I traced the left half of the original bib onto tracing paper. I then folded the tracing paper in half, vertically, and traced the right half.
The bib is made with TWO layers of flannel. Place them WRONG sides together with the pattern on top, and cut both layers at once.
I cut the outline using my rotary cutter - no need to worry about perfection with a soon-to-be raggy edge!
Oh! I used a rotary circle tool for the neck holes, too.
See the lines I marked to find the center point of the red circle? If you save that first cut-out to use as a centering guide for the remaining bibs you won't have to mark again. Just set the marked piece in place according to the pattern, remove the pattern, and then cut using the tool.
Easy, peasy!
Another tip - don't cut the separating line all the way through to the neck hole.
Cutting it partway lets you know where to sew, but the "bridge" keeps things from flopping around and stretching out of shape as you stitch.
Layering the wrong sides together means you are now ready to sew without adding any extra flips or turns!
It is possible to sew the entire perimeter AND the neck hole without breaking the thread. I used about a half-inch seam allowance - don't worry about being too exact here. Close is good enough!
Start on one side of the bib and stitch to the slash - turn the corner and follow the slash to the neck hole. Follow around the hole back to the slash. Turn the corners and stitch your way back out to the perimeter.
This is what it looks like after stitching:
At that point, finish cutting the slash to the neck hole.
Then snip around the entire perimeter and the neck hole to create a raggy edge. Be careful to cut UP TO the stitched line, but not through it.
Add a small snap or a bit of Velcro to finish.
I happened to have *ahem* VINTAGE snaps on hand from my very first sewing kit - laugh if you will, but they came in pretty handy 40 years later, didn't they? Ha!
From a safety perspective, I wouldn't use anything around a baby's neck that doesn't release easily. Please use your best judgement if you decide to try a similar project!
The bibs measure about 10 or 10.5 inches wide, and about 14 inches long. The neck hole is 3.5 inches across. Keep the fasteners inside, and close to, the stitched edges of the neck "ends" by the slash - you don't need much overlap.
In the Studio
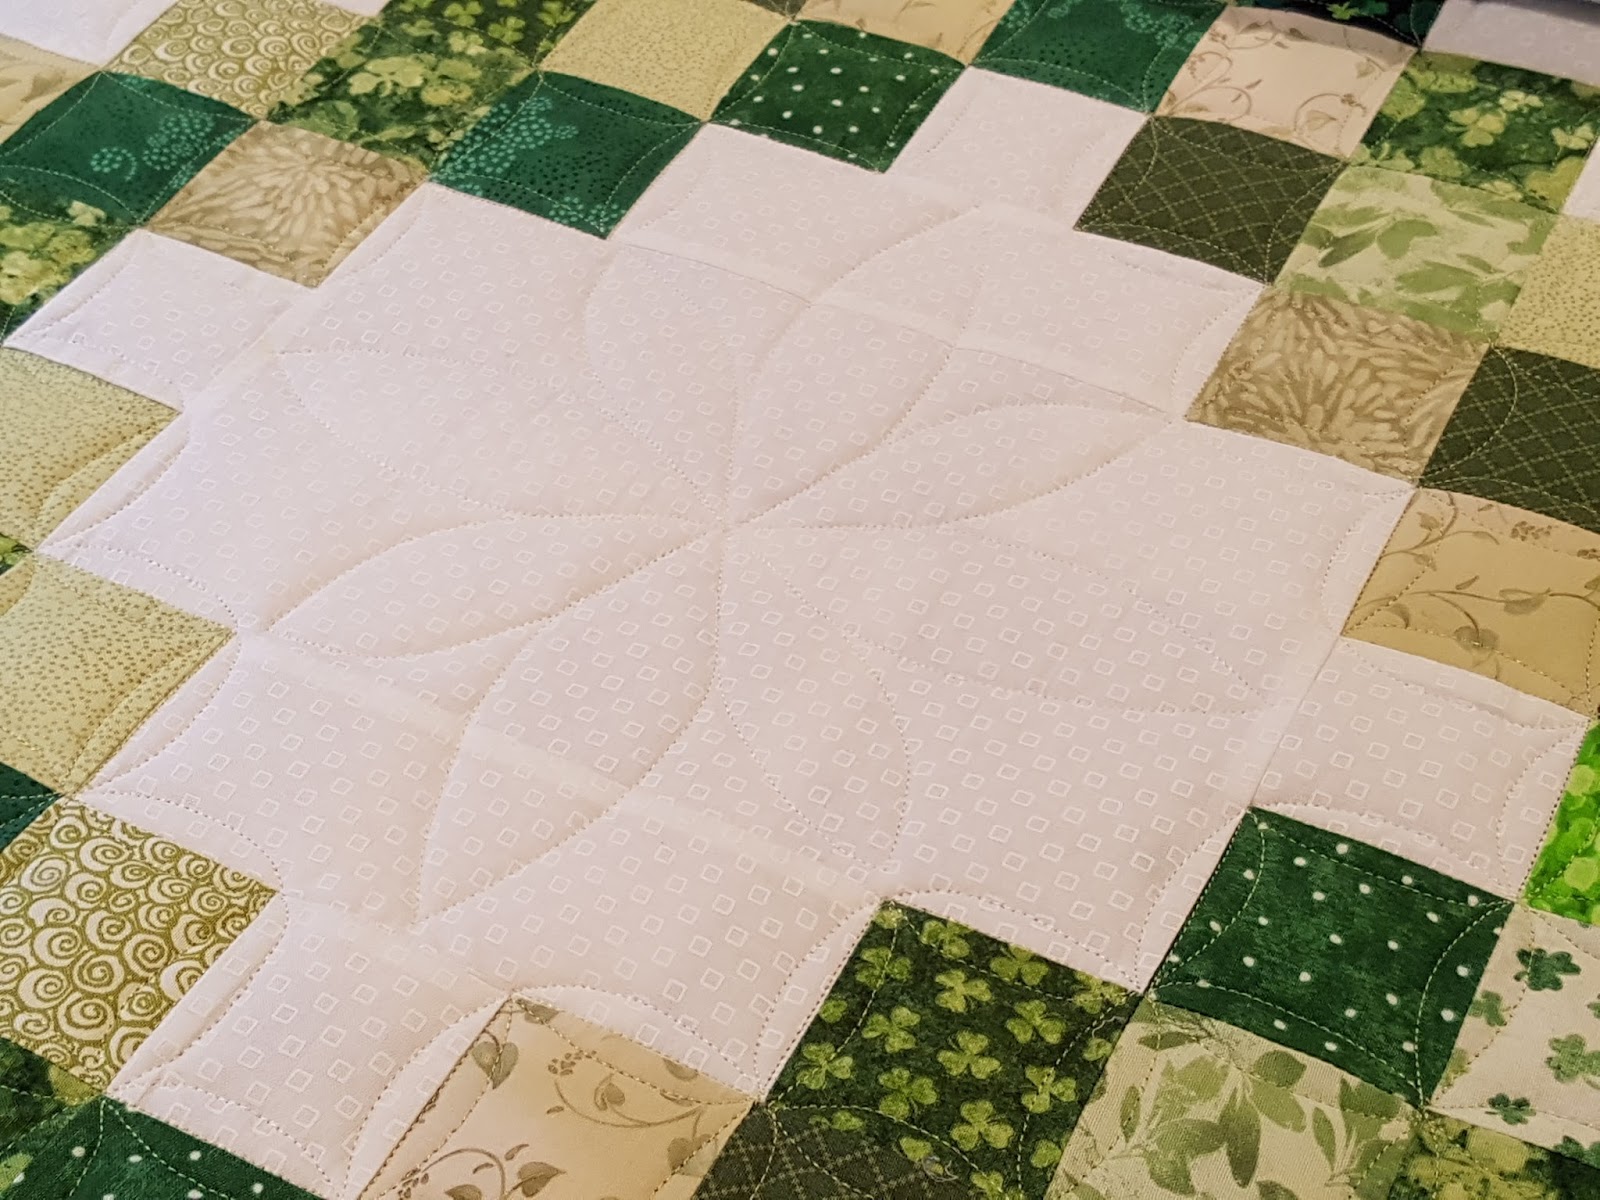
You know how sometimes simple, classic designs trump fancy ones? The quilt on my frame is a case in point.
I'm reluctant to say how long this has been on the frame, but it's been a while.
I tried some stuff. And I *hated* it. So I tried some more stuff. And hated that, too!
That's real life for ya. Sometimes things don't work out the way you think they should.
Now that the quilting plan has been simplified, the quilt is much happier!! (and so am I!) I just wish I'd taken this route sooner.
My seam ripper and I will be "reverse sewing" tomorrow, and then I'll be able to finish the last three blocks and get this beauty back to its owner!
House Update
They still tell me I'm not allowed to move in yet. Spoil sports. Ha!
I believe the plan for this week is to get the walls primed and to start the flooring - yay!
As always,
Try, Learn, & Grow!
Carole
Somehow my work space shrank to approximately 15 inches square. Ever have that happen?
 |
| Time to clean up! FreshofftheFrame.com |
Time to clear the deck.
Being my stubborn self, I decided that my fabric would fit into its designated cabinet NO MATTER WHAT.
It meant pulling everything out and re-folding every piece of fabric, but I did it!
 |
| Tidy again! FreshofftheFrame.com |
The mess got bigger before it got better, but it was a great way to rediscover my stash!
 |
| FreshofftheFrame.com |
And, look - my table has been FOUND!!!
 |
| Much better! FreshofftheFrame.com |
Now I'm on a mission to use things up!
First up, I made three reversible minky & flannel crib blankets for my sweet, new grandson.
 |
| Minky "giraffe" and a wee baby laugh! FreshofftheFrame.com |
The blankets would have knocked my stash back several meters - if I hadn't purchased the fabric specially for the job. (Hmm. I'm beginning to understand my problem . . .)
Second attempt at stash busting - half a dozen baby bibs.
 |
| FreshofftheFrame.com |
This time I DID raid the stash - the special stash. (Everyone has a special stash, right?)
When we were little, my brother and I had pjs made from this very fabric! My mom passed her flannel leftovers to me when my kids were little. What I didn't use for them was tucked away again, and has now been resurrected for my grandson!
Let's call that fabric "vintage". (Just ZIP IT if you thought "antique". Ha!)
 |
| Ready for their first wash to fluff their edges FreshofftheFrame.com |
I used a bib from my daughter's babyhood as a pattern.
(Yes, I saved it. Yes, it was used for all of my kids and grands - and visiting littles, too. And yes, I'll probably keep it forever! Doesn't everybody keep random baby items forever?)
 |
| The original bib - rootin' tootin' cute! FreshofftheFrame.com |
Anywho. Enough about my hoarding ways. Back to the bibs!
How they were made
I decided to use flannel (instead of denim) to keep the bibs soft and flexible. The goal is to keep baby's neckline dry when he drools, eats, and spits up. Absorbent is good!
To make a symmetrical shape, I traced the left half of the original bib onto tracing paper. I then folded the tracing paper in half, vertically, and traced the right half.
 |
| FreshofftheFrame.com |
The bib is made with TWO layers of flannel. Place them WRONG sides together with the pattern on top, and cut both layers at once.
I cut the outline using my rotary cutter - no need to worry about perfection with a soon-to-be raggy edge!
Oh! I used a rotary circle tool for the neck holes, too.
 |
| FreshofftheFrame.com |
See the lines I marked to find the center point of the red circle? If you save that first cut-out to use as a centering guide for the remaining bibs you won't have to mark again. Just set the marked piece in place according to the pattern, remove the pattern, and then cut using the tool.
 |
| FreshofftheFrame.com |
Easy, peasy!
 |
| FreshofftheFrame.com |
Another tip - don't cut the separating line all the way through to the neck hole.
 |
| Leave a bridge FreshofftheFrame.com |
Cutting it partway lets you know where to sew, but the "bridge" keeps things from flopping around and stretching out of shape as you stitch.
Layering the wrong sides together means you are now ready to sew without adding any extra flips or turns!
It is possible to sew the entire perimeter AND the neck hole without breaking the thread. I used about a half-inch seam allowance - don't worry about being too exact here. Close is good enough!
Start on one side of the bib and stitch to the slash - turn the corner and follow the slash to the neck hole. Follow around the hole back to the slash. Turn the corners and stitch your way back out to the perimeter.
 |
| Stitch all around FreshofftheFrame.com |
This is what it looks like after stitching:
 |
| FreshofftheFrame.com |
At that point, finish cutting the slash to the neck hole.
 |
| FreshofftheFrame.com |
Then snip around the entire perimeter and the neck hole to create a raggy edge. Be careful to cut UP TO the stitched line, but not through it.
 |
| FreshofftheFrame.com |
Add a small snap or a bit of Velcro to finish.
I happened to have *ahem* VINTAGE snaps on hand from my very first sewing kit - laugh if you will, but they came in pretty handy 40 years later, didn't they? Ha!
 |
| FreshofftheFrame.com |
From a safety perspective, I wouldn't use anything around a baby's neck that doesn't release easily. Please use your best judgement if you decide to try a similar project!
The bibs measure about 10 or 10.5 inches wide, and about 14 inches long. The neck hole is 3.5 inches across. Keep the fasteners inside, and close to, the stitched edges of the neck "ends" by the slash - you don't need much overlap.
In the Studio
You know how sometimes simple, classic designs trump fancy ones? The quilt on my frame is a case in point.
 |
| FreshofftheFrame.com |
I'm reluctant to say how long this has been on the frame, but it's been a while.
I tried some stuff. And I *hated* it. So I tried some more stuff. And hated that, too!
That's real life for ya. Sometimes things don't work out the way you think they should.
Now that the quilting plan has been simplified, the quilt is much happier!! (and so am I!) I just wish I'd taken this route sooner.
My seam ripper and I will be "reverse sewing" tomorrow, and then I'll be able to finish the last three blocks and get this beauty back to its owner!
House Update
They still tell me I'm not allowed to move in yet. Spoil sports. Ha!
 |
| FreshofftheFrame.com |
I believe the plan for this week is to get the walls primed and to start the flooring - yay!
As always,
Try, Learn, & Grow!
Carole
The before and after is impressive! I also have the rule of everything fitting into the existing designated space. It can take some creative space management!
ReplyDeleteI love my circle cutter, one might not use it a lot but it sure works great when you do! Um yes I can relate to that 15" space, LOL I love going through my fabric once in a while, those stacks just don't stay as neat as they should, haha. It's a great way to remind outselves of what we have.
ReplyDeleteFirst of all, LOVE that little guys smiles! Second, OMG YES my cutting space has been reduced to the same level...I totally LOL when I saw that. And...I've also learned, sometimes simple is better. Enjoy the stage your house is in...this is so fun as you actually start dreaming about actually living there!!! ENJOY!
ReplyDeletePS: I use a glass as my circle template! Bahahah!
DeleteYes, my work space definitely shrinks on occasion. Your stash looks beautiful all tidied up, and the bibs are really sweet. The house is really taking shape and I bet it is exciting to see it come together. :)
ReplyDeletethe living room (I assume that's the living room) is GORGEOUS!!!! So exciting!!! When you told me you found your table again, I had no clue you'd emptied your cabinet first. goodness, that was a job!! (I don't think you can call it hoarding if you actually USE it ;-) Never mind how long it takes to do so.... :-)
ReplyDeletethe little cowgirl bib is so cute!
DeleteYour grandson is adorable! Your stash looks so pretty all folded nice and neat like that. Those bibs sure look cute as well.
ReplyDeleteI am so excited because I am now signed up for Sue Patten's workshop in March. :)
Wow, what a beautiful 'resource center'! My cutting space often shrinks like that too!
ReplyDeleteThere's so much goodness in this post! First, the title cracked me up and I couldn't click over here fast enough. Lol. Yes, my space often shrinks like yours, but you did a great job cleaning it up! And I think it is super cool that you have fabric that is being used for several generations of the family. How cool to tell your grandson you had PJ's that look like his bibs! He's a cutie too!! It will be an exciting day when those floors go down!
ReplyDeleteWhat a fantastic smile on your grandson. Such a blessing! I, too, have been reorganizing my sewing room. I find I think better, and don't get that anxious feeling about all the work ahead of me, if I have an orderly space to work in. Doesn't happen often, but when it does, it sure helps! Your house is getting down to the wire, it looks like - awesome. You'll be so glad to make the move after all this time waiting.
ReplyDeleteI'm in the process of digging out my work space, now. It's amazing how fast stuff builds up. Thanks for the bib tutorial.
ReplyDelete